Showing posts with label gesso. Show all posts

Friday, 12 August 2016

Paper Piecing

Here is my paper pieced page in my junk journal, using the PaperArtsy topic of Paper Piecing as inspiration. 

This page was lumpy from the additions to the previous page, so I added some gesso to even it out a bit, but then decided to just go with the lumps. 

I added PaperArtsy Infusions and let then dribble and pool into the dips between the lumps. I actually really loved this stage. 


I then cut some patterned paper into sections so that I could piece this heart. 


 and did the same with some letters. 


I inked all the edges to give definition between the joins. I also added shading down one side with a water soluble pencil, and some stamping. 


I added the same shading etc to the word side. 


All done 


Darcy x


Thursday, 9 October 2014

Studying under the Masters Week 1.part 4

yes I have skipped a part.. 

Part 3 is sculpting, and mine is started, but I am waiting for it to dry before I can carry on. So in the meantime I am doing...

Part 4. This was an exercise in drawing faces, getting proportions correct and using a specific blending technique. 

The first part involves drawing a face in charcoal (shudder, I really dislike charcoal)

{After a black crayon sketch by Van Gogh 1885}


Then we were to blend with gesso. Not a fan of this outcome at all, I have no idea why. 


I have done this blending technique many times before, but using neocolor II crayons and blending them with white acrylic. 

So I decided to draw the old peasant woman again, but this time give her some colour. 

Drawn out with 2b


Blending the skin tones of neocolorII crayons with white acrylic. 


I kept the colours simple and muted, after all his paintings of the time were all dark and murky, it wouldn't have been a good representation to to her in hot pink clothing lol 

So apart from the skin tones and white acrylic,  I only used Sepia. 


I could have added so much more, .. more layers , more washes, gone back in with graphite or finished it off with coloured pencils. 

I didn't want or need this to be a finished piece though, this is merely a blending exercise, so I am leaving it as is.. 

She looks much older in the colour version, this is I think down to the initial sketch. it was finer, and so I was able to make her face slimmer in the colour one. In the charcoal one, the charcoal spread a lot and made all her features more chubby, making her look younger. 

I do prefer the colour one. 

as a quick experiment, I also tried blending 6b with gesso, a pitt pastel with gesso, and a stabilo pencil with gesso.. 

The pitt pastel blended away into nothingness, the 6b and the stabilo, once blended were almost identical to the charcoal/gesso combo. 

*twiddles thumbs while clay dries*

Darcy x

Monday, 9 September 2013

Back to school

It's that time of year again, all the stressed out Mum's are shopping for uniforms and shoes and school bags and books.

As a kid, the best thing, for me, about going back to school was getting a new pencil case. Actually the thought of a new pencil case even now makes me a little giddy. Whenever I am in the stationery shop i always go and look at them, shelves and shelves of them. Silly i know, but there is just something that draws me to them.

So with that in mind, I thought I would encourage you to take out a little time from the back to school shopping, time to sit and play, and end up with something useful for either yourself or your kids.

The simplest pencil case to make is a tall pocket with a flap closure. There is a little sewing involved, but not much, and you don't need to worry about inserting a zip.

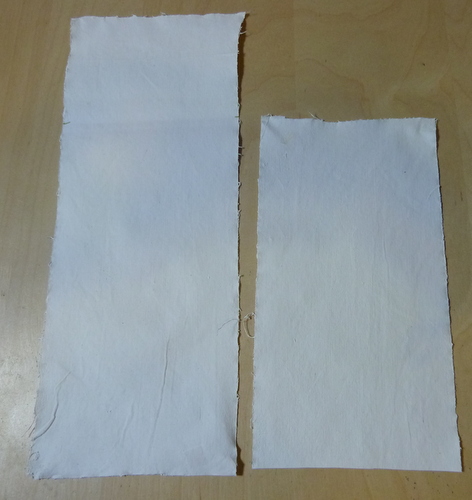
I decided on my size, then cut some calico a little larger, I then gave this 3 coats of gesso. One piece is roughly the right size, the other is about 3 inches longer. This extra bit will be the flap that folds over.


Once the two pieces are dry, add a little trim or bias binding to the top edges, then stitch the 2 pieces together. Starting from the top of the shorter piece, down the side, across the bottom and back up the other side....ending at the top of the shorter piece. 

Snip a little off the corners and turn the right way out. the fabric will be stiff, poke the corners out with the end of a narrow paintbrush or knitting needle. 

You now have a tall pocket/envelope type of shape, with a loose flap at the top. 

Take your favourite stamps and create your design. I used the new stamps from the JOFY range at PaperArtsy.

Here is the back. 


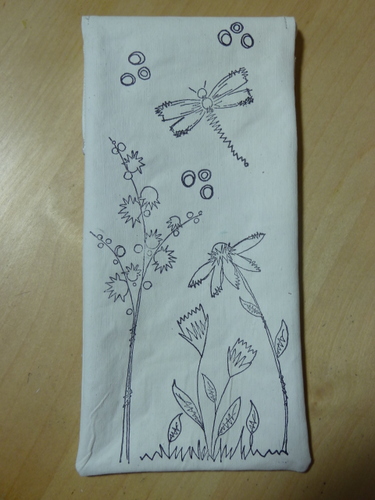
and here is the front..


Now take your PROMARKERS... and colour in to your hearts content. Because you are working on gessoed fabric, the promarkers will not dry immediately like they do on paper. They will reactivate and blend very easily. This take a little getting used to. 

here is the back again..


and the front all coloured in..


Once coloured in you can use your BLENDER... to remove small areas to create highlights. 


I decided to add my name to the space on the front of the flap..


To make it more durable I coated the outside of mine with acrylic wax.I then added a square of velcro under the flap. 


all that is left to do is fill it up..


Hope you have fun creating some back to school supplies. 


GIVEAWAY..

I have 2 packs of  Promarkers to give away. These are the 2 packs that I used in my project. 


To win BOTH of these sets you must do TWO things for me. 

1. Leave a comment on my post on the Letraset blog  HERE...

AND ALSO

2. Add your name to the linky below.