


This is nothing new, if you saw my giraffe post from last summer then you will have seen me use this method back then. I also used it at Christmas time on cards. However I have never before written up a full blog post about just the technique. Recently I shared a photo of some papercasts and was asked how I made them, so here goes..
There are 2 methods that I know of, I much prefer method 1, but I have done them both here for you to see. At the end you will see why i prefer method 1.
Method 1.
I took 30 sheets of toilet tissue, and soaked them in a bowl with warm water. Leave them soaking for 30mins, this starts to break apart the fibres.
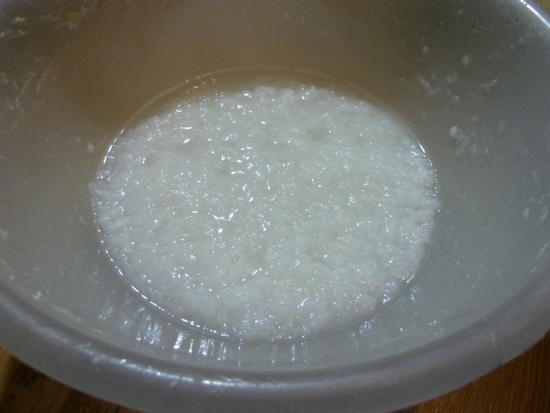
Next, use a hand blender to break down the fibres even further. I DO NOT use this blender in the kitchen, it is kept purely for paper making.
Small kitchen items are cheap enough that you can buy spares for your art rooms, I have a bowl, sieve, spoons, blender, mixer,iron,cat litter tray,cloths etc All these items live in my art room and never go near any food.

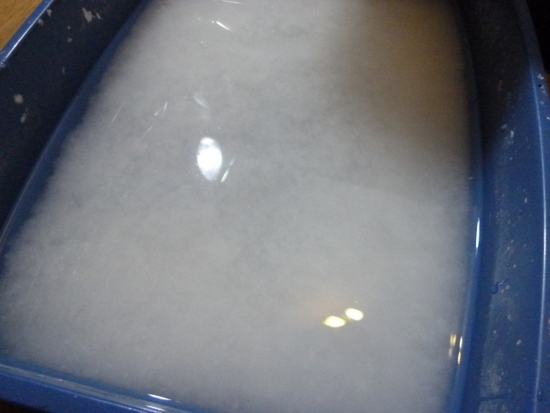
Tip the wet pulp into a cat litter tray..

Then add more warm water, I added 2 bowlfuls of water to this mix. Exact quantities are not important.
Next you will need a frame and deckle. You can buy papermaking ones, but it is so easy to make a set. All you need are 2 identical frames. Take out the glass and backing boards, and remove the little metal clips from the back that hold it all together.
Now take a piece of net fabric, i used a piece from an old net curtain. Staple it to the back of one of your frames, making sure it is stretched tight and flat.

Any net/mesh will do, as long as the holes are small.

Now, lay the empty frame over the one with the net... as in this photo... so that the frames are back to back.

Holding the 2 frames togerther, swish them back and forth UNDER the surface of the water/pulp mix. This will cause the pulp to swirl around in the water and separate evenly.

once the pulp is moving evenly, slowly lift the frames up. The pulp will settle inside the frame, and excess water will pour out of the sides... so keep it held over the tray. Do not shake the frames, the pulp is still too wet and you will dislodge it.
Hold for a few seconds, then remove the top frame.

Take a chamois and VERY carfeully press it onto the wet pulp, this will push more water out underneath and also soak up some water on top.

Lay a cloth down on your work surface and flip the frame over onto the cloth. Gently tap until the sheet of pulp comes away. Lay another cloth on top and press carefully to absorb more water.
Congratulations, you have now just made a sheet of handmade paper. If you want sheets of paper, then do nothing more, just let it dry.

However, we are casting.. so gently tear away sections of the wet paper..

and lay them over your chosen molds, n my case I like to use rubber stamps. Take a dry cloth and press the paper into place, squidging it into all the crevices.

leaving the stamp inside for now, put your paper casts onto another cloth or towel to dry. Carrying on, making more sheets of paper, then tearing them up and pushing them down onto stamps.

Once you have used all the pulp in the cat litter tray. I made about 6 sheets with my pulp... you can then take each one, and carefully flip it over in the palm of your hand, remove the stamp. Try to not twist the wet paper, lift out the stamp as cleanly as possible and then set them out to dry.
They will take approx 12hrs.

When they are dry you can see the lovely detail that has been captured.

It is hard to say which stamps will work the best, but those with larger, more open designs do seem to work better.

You will soon see which of your stamps work the best..

You can now cut around each papercast, I like to leave a small border. Now you are ready to spray with ink, or paint... and of course they look wonderful with a little gilding wax/treasure gold rubbed over the surface.

This is the paper that was cut off... don't throw it out, next time you make paper, just throw it into the bowl and soak it to break it back up.

I did say to use bolder, more open designs, they really do work best. However I tried this one just to show you. The details are very small and close together. The papercast has worked, but the details are not so well defined. Also as this is a more collage type stamp, you will note that I tore around the edge rather that cutting it. For this particular stamp this works well and adds to the softer feel.

Okay I promised you 2 methods.
Method 2.
Lay your chosen stamps down, and spritz with water.

Lay a sheet of toilet tissue over each stamp and spritz again, press the tissue down.

Repeat, till you have used 3 sheets on each stamp, keep them thoroughly wet.

Set aside to dry. You can see this method makes lovely deep and clear impressions.

Cut them out..looking great huh..

But as you handle them look what happens..

The sheets just pull apart, completely..This method is just unstable.

The reason this happens is because you are just pressing sheets together, with nothing to hold them in place. So why does the first method work? that's just paper and water right?
In the first method you are breaking apart all the paper fibres, then in the water,as you swish them around they start to interlock and want to cling back together. Pressing them into place helps this further.
I am not sure how to explain it further... if you took two woollen sweaters and lay them on top of each other, pressed them down... nothing would happen right, they wouldnt stay together. BUT, if you unravelled the yarn, and threw all that yarn together and mixed it up.. it would get all tangled and cling together. The same happens with the paper fibres. Method 2 is less successful because the sheets are smooth and already compressed, the fibres are flattened and so cannot cling to anything new. Method 1, roughs up those fibres, and they grab onto each other as soon as they touch.
I hope that helps, I realize method 1 is more more time consuming, but you do get a lot of papercasts from it. From 30 sheets of toilet tissue i got 40 papercasts.
Here are some that i did last year, they look great once coloured.

Here are some more, that I made into this hanging board. They add a lot of dimension.

Darcy x


.gif)


Thank you for all your hard work putting together this tutorial Darcy. Instructions are very clear & can see why method 1 is best. Colin was definitely a labour of love but so is everything else you do.
ReplyDeleteGreat results, fab texture and dimension and the casts of your stamps looks amazing with the TG added:-) xxx
Brilliant as always Darcy. Need to catch up with it again when back from hols. Xx
ReplyDeleteOMGosh how wonderful this is...thanks for sharing with us....
ReplyDeleteDarcy, thanks so much for the detailed tut. I've often wondered how to do it and now I know. Will deffo give the 1st method a try. Would the 2nd method work if you used a pva/water mix to wet the toilet paper? Hmmm..... Jean.x
ReplyDeleteI was just thinking the exact same thing! I always used a drop of PVA in my paper-making too! Sam
DeleteSuch a fascinating process! Thank you for taking the time to explain it all so thoroughly Darcy, the finished pieces look great.
ReplyDeleteThe detail is fabulous - great tutorial, Darcy. Especially now I know why you've shared this now!!
ReplyDeleteOh wow!!!! Thanks so much for sharing all this Darcy, I will certainly have a try on your technique one day, this is so fun and the results are fantastic!!! Wonderful tutorial, thanks a lot again. Coco xx
ReplyDeleteThank you!! Been asking myself how you do this... project to get started after the hols .. thanks for shating
ReplyDeleteAwesome tutorial! I've made handmade paper before and even made a paper bowl but it hadn't occurred to me to use my rubber stamps for castings.
ReplyDeleteI made a ton of handmade paper one year. I never thought to use toilet paper, but I have used recycled paper and a blender on high (not the stick blender) to get my paper to the stage you got your tissue. But yours is fine, much finer than recycled copier paper. And yes, I've made those stamped castings before, but I used method 2. Now I know why it never worked. And of course, I did it before I ever started making my own paper.
ReplyDeleteKUDOS for this great post, dear.
Fascinating, I hope to give this a go, thanx for sharing, do you do any videos?
ReplyDeleteWhat a brilliant tutorial, Darcy! Glad Colin didn't fall apart!
ReplyDeleteLucy x
I've used a mthod similar to method 2, but laying down wet toilet paper onto an embossing folder. and putting it through a cuttlebug. The pieces stayed together. I think if you mixed up some wallpaper paste you could paint it onto each of your layers in method 2 and they would stick.
ReplyDeleteThanks for sharing this Darcy. Paper-making is something I've wanted to try for a long time: I've even got a kit somewhere. Your great results from pressing on to stamps have inspired me all over again.
ReplyDeleteI'm definitely going to give this a go, thanks for the fab tutorial, I'll be pinning it! Sam xx
ReplyDeleteGreat tutorial and I love the resulting casts.
ReplyDeleteDarcy,
ReplyDeleteWOW this is really something new for me :). I may be able to get it done time permitting. As always excellent instructions.
Wow, wow, wow, wow, wow, wow and wow. A fantastic tutorial so full of detailed, clear instructions and useful photos - and a brilliant brilliant technique - this is a bookmark for a rainy day! Thank you.
ReplyDeleteAlison xx
Brilliant tutorial, such clear and concise instructions. I've not seen this technique before but the results are fab & following your methods I feel confident that I could do this so many thanks for sharing - this is going on my 'to do' list!
ReplyDeleteawesome tutorial, thank you for such great instructions on the process.
ReplyDeleteI've done the first method. Remember when pressing your own paper was the rage? You may be to young tho. One of my twins in highschool was also making paper in art. That was around 1997-98. The way we made it was about the same except we used a blender. Also we use all kinds of paper, except glossy like magazines, etc. we tore it up into small strips until we had a trash bag full. Of course with all the paper coming in the mail back then it was easy to get a full trash bag in a snap, plus the weekly newspapers. I think it was part of a recycleing rage going on here in the U.S. Anyway you filled the blender half full with water added the paper, put the lid on & turn on the blender. Adding paper & water as it dissolved into the pulp. Set up pretty much like you did with the litter box or a shallow storage container. Also we made the screen pretty much the same also. The difference in it sometimes we poured the mixture onto the screen moving it around til even and the size we wanted (depth) I liked a different way where you had two litter boxes, one with all the pulp & one with the screen over it. Then you'd scoop it from one to the other, making larger sheets. Made some nice books that way, also if you added a bi deer to it you could write on it. Starch in the box was a binder. There are several different kinds to use. Another fun thing to do was to add herbs & flowers to the pulp or while it's on the screen drying. Plus color, if not from the paper, from food coloring or fabric dye, such as Rit. I don't see why you couldn't do the stamps the same way. I also have some molds that are used for making shortbread cookies my favorite is a snowman. That made an adorable mold for the paper mold. I mounted it on another piece of paper, usually watercolor, & painted sometimes a background on the paper or not & framed it. That would be lovely for a journal page. Gosh the possibilities are endless. I've just recently started doing layers of mixed media. I'm taking a course from Tamera Laporte. It's so different than what I normally did. I really love the journal ideas, I'm new at that also. Mostly painted oils or watercolors. Never used any of all the wonderful products out there now, like gelly sticks, or water soluble crayons. It's so fun. Those would be fun to add to the mixture! This was a wonderful tutorial you did. I'm so happy I found you. I do like your journal ideas also. Very beautiful! Thank you for sharing so much with others. By the way I found you through a link from Letraset Aquamarkers, & I found them from a link of supplies that Tamera listed! I love the way those things happen... I hope you don't mind that I explained a way we made paper a long time ago. The only thing that's not fun is the horrible mess it all makes. We did make some beautiful papers. But they are very delicate. Working & then my health but a stop to a lot of crafting & art for me, but I'm back with the art, because of the health. I needed it for my pain as a healer. Thank you, sorry about this book I wrote😕 but I really enjoyed watching you & reading. TC Gail
ReplyDeleteThank you for sharing this wonderful tutorial. I just discovered this method which I find really exciting.
ReplyDeleteKind regards from the EU (A)
elenor
bonjour c est superbe mai j ais une petite question avec quoi peu ton les colorier je vous remercie d avence superbe idée
ReplyDeletepatricia ..bonjour c est superbe mai j ais une petite question avec quoi peu ton colorier je te remercie d avence superbe idée
ReplyDeleteNice articles and your information valuable and good articles thank for the sharing information Cat litter box
ReplyDelete