Showing posts with label DarcyUK. Show all posts

Sunday, 18 February 2018

New Stamps February 2018

A New Direction
{and a blog hop}


Woohoo! Today is an exciting day. Today is the day my newest stamps are launched by PaperArtsy. It has been a busy (totally crazy) couple of years for me as I work my way through my degree course. I was sad to not have the time for stamps last year and was determined to bring you something new this year. 

For one of my assignments last year I had to designs some illustrations for Grimm's fairytales. 


When Leandra saw these she thought that something similar would make great stamps, so this year I worked on some little characters, and here they are. 

EDY20 {Dottie and the Prof}

                                                        EDY21 {Joe and Lydia}

Keep an eye on your favourite PaperArtsy retailer for when these stamps arrive.

Here are a few samples to whet your appetite. 

Balloons. 
Here I created a drippy background before layering with a simple piece of smoothy card. then I stamped the little Prof from EDY20 before colouring with watercolour pencils. Finally I stole a couple of  balloons from Joe on EDY21, once they were coloured I added glossy accents to make them pop. 


Family Circle
A square card with blended stripes of just 2 colours, keeping the colours very similar gives a classy feel. I then drew a circle and cut that out, using it as a mask I was able to stamp the houses from Lydia's head. I admit to a couple of practice goes on just printer paper, but after that I was away and stamping around the circle. 

I finished by adding the welcome sentiment stamped onto acetate. Everything is attached on foam pads to add dimension. 


Joe and Lydia
A simple brayered background is the setting for Joe and Lydia. Do you see the little dangly hearts? they are from the side of the tree on EDY20. The flower centres are individual hearts from the border on EDY20, and it is all grounded by using my edge stencil PS031.


Welcome Home
A simple card now, ideal for a new home gift. the house from EDY21 is coloured with watercolour pencils and then the background is blended in afterwards using Fresco paints. I wanted to make the background  a little more interesting so I stamped some circles with a lid, but only very lightly, I didn't want them to be overpowering. 


Another card using the Prof, can you tell he is my favourite? I used the Snowflake resist method in the background and then just layered up the elements. Do you see those gifts? they are the windows of the house from EDY21. 


Now for a couple of stepped out projects, just to show you my working process. 

Loving the Moonlight

Step 1. A square of heavy smoothy with blended London Night and Moonlight, once the card is covered the colours were dry brushed to blend them. Next I used WOW embossing powder and the circle stamp from EDY21 and the hearts from EDY20, these were coloured with watercolour pencils. 


Step 2. I then added white circles using my stencil PS031, once dry I drew a scribbly outline around them in pen. 


Step 3. I drew around a roll of cellotape and cut this out, then painted it using Moonlight. the tree was stamped onto brayered card then the top section cut out. 


Step 4. I stamped the Prof onto smoothy card and coloured him using watercolour pencils, before cutting him out and mounting onto the centre circle. 


Step 5. Add the sentiment and some finishing touches with pens and glossy accents. 


Flower Spool

Step 1. I painted a wooden spool using Zucchini, I then stamped the 'welcome' sentiment onto a book page and glued that around the spool. 


Step 2. I added part of a wooden skewer, painted in the same colour. 


Step 3. I painted lots of bits of smoothy with my favourite bright colours and stamped out the flower from EDY20. 


Step 4. I arranged some of the flowers around the spool and others added to wire which was wrapped around the skewer. 


Step 5. Little Lydia was stamped and coloured with watercolour pencils, before being fussy cut. If you look carefully you can see I left a bit of card just at her feet, like a tab. This was bent to the back. 


Step 6. the tab was glued down to the flowers, and then small foam pads were attached to the back of Lydia which then cling to the stick to keep her upright. Final touches include white pen dots and self adhesive pearls in the flower centres. 


I hope you love them as much as I do, they really are fun little characters. 

Now for the blog hop!

My partners in crime have come up with great samples for you, they have had some serious fun with these stamps. 

First up is the fabulously talented Lauren Hatwell. Her ideas are  always ingenious, she can look at stamps and see them in a completely different way, I love that! She has made some samples that will make you squeal and want the stamps even more. go on over to her blog and see them HERE. 

Next up the bubbly Miriam Grazier, she was so excited to get her hands on the stamps, and couldn't wait to play. Miriam has a bit of a high powered job and she is always on the go, so in her downtime she loves to create. Go on over to Miriam's blog and see what she has created. HERE. 

Darcy x

Sunday, 9 October 2016

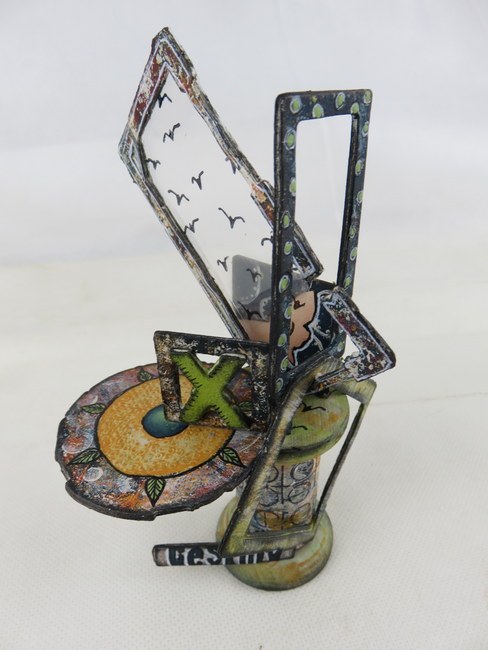
Tiny Time Machine

Tonight I am on the PaperArtsy blog with a little assemblage. The brief was to use die cuts, and I really wanted to see just how sturdy they could be when stacked and glued in multiples. 

I had no project in mind for this one, I was just playing around with balancing them to see how they looked. In the end the whole thing looked like some strange navigation tool, and that made me think of a time machine. 


Pop over to the PaperArtsy blog to find out how it all came together. 

Darcy x

Saturday, 22 February 2014

February Journal challenge.

I have done another journal page challenge this month over on the PaperArtsy blog. Here are some sneaks...


Please pop over to the PaperArtsy blog to see my full post with oodles of photos. I would love to see you join in, if you do you can link up and be in with a chance of winning some stamps. 

Darcy x

Friday, 21 February 2014

Home is where the heart is...

My final sample for this week..... I promise to play and come up with more. 

I decided I wanted a fabric frame, I really didn't get much further than this thought in the planning stages. So, while I did indeed make a fabric frame, it changed so much by the end. 

I began by cutting a square of heavy weight smoothy, make sure you can divide up the edges into decent sized sections. I chose to work on 8inches by 8inches. next I cut out 28 squares of greyboard, and 28 squares of fabric. I also stamped some images onto scrap paper, just so I could play around with placement. 


My plan was that some of the pattern would show through, so I varied the patterns that I chose. In the end, none of the pattern shows through, so if you want to make this as I did then just use any old fabric. 


I glued the fabric to the squares of greyboard, then glued each square to the edge of the heavy smoothy card. Once it was all dry I used a craft knife to cut away the centre. The squares now have a stable backing, though they do still have some movement, which I like. 

Next I  stamped the border from EDY07, using snowflake fresco paint. This was just so that I could get my placement right. 


Once I had my border worked out, I then used a palette knife to carefully spread grunge paste over the border, following the lines of the swirls. while still wet I stamped into the paste using the background stamp from EDY06


 When it was dry I painted the grunge paste with Space Cadet, and I coloured the rest of the fabric that was showing with Autumn Fire, Blood Orange and Claret. Doing this totally obliterated the pattern on the fabric, so as I said at the beginning, you can use any cotton fabric. However you are still left with the texture of the weave, which I really like. 


I then worked in some Treasure Gold. Here you can see the individual squares of fabric, linked with the grunge paste swirls. I painted the sides with French Roast, just to hide the greyboard edges. 


Next I took another square of heavy smoothy, the same size as before. I streaked on some Chocolate Pudding, Sage and Toad Hall.


over this I added a coat of Crackle glaze, and then a top coat of Nougat. The crackle glaze did it's magic, and while still damp I rubbed back some larger areas. 


I tried it inside my frame, and really liked it..


Next I stamped the 3 hearts from my new collection.  the smallest is from EDY07, the one in the ring is from EDY06 and the middle one is from the birdie mini EM02.


These were all stamped onto regular smoothy. I coloured them with Tango, Autumn Fire and Blood Orange. then I cut them out, turned them over and popped them onto a mouse mat. I then used a dry embossing tool to make them slightly domed. 


I stamped the flower stem/border from EDY06 directly onto my crackled background, and attached the 3 hearts using a little foam pad. 


You  can see how doming them gives a nice gentle curve. I added some flicks of pearl glaze to the flower ring, just to add a little shine. 


Now I stamped one of the houses from EDY08.  I coloured it with the same colours used on the rest of the project.


 I also stamped the wheels again, so that they could be layered on top. Again I turned this piece over, and made the round sections a little domed. 


I glued the house into place, attached the wheels on foam pads. I decided that the raised hearts and wheels needed to stand out a little more, so I added a couple coats of satin glaze to them. I added some darker paint to the edges, and also a line around the middle, just where the frame will sit. This inner line will add shadow once the frame is glued on. 


I then  glued the fabric frame on top of the crackled piece.


Lastly I needed to add some text. On a scrap of deli paper I wrote 'is where the heart is...' using a black fineliner. I glued this down the right side using matte medium. Deli paper is great for this, as when you glue it on, the paper all but disappears leaving just the text visible... in the same way as tissue paper, but deli paper is stronger. 


This left me a space at the top for the word 'Home' I wanted to keep it simple, so I painted some smoothy with Space Cadet and a little Ice Blue, then I stamped the word using the brand new alphabet from Jo Firth Young. JOFY21


I cut it out and added a little French Roast to the edges. 


To add a little more texture and interest, I backed the text onto a scrap of hessian. 


and here it is all finished. I really love this piece, so much to look at and to touch but none of it overpowering. 


Darcy x

My stamps are also available from 

Thursday, 20 February 2014

Lollipop Garden

I love to take not just stamps but parts of stamps and create whole other images with them, you should have fun with your stamps, cut them apart and put them back together in as many ways as you can think of. I love the lollipop flowers from  EDY06 as they are... but I wanted to extend them and make them into giant lollipops. 

I started with this 6x6 flat canvas. I created a very subtle background by stamping the bubble background stamp all over the canvas using Snowflake Fresco. 


This first layer creates a resist, once dry I added Tango, Autumn Fire and Blood Orange.. Each was loosely brushed on and then wiped off . The canvas is delicately coloured and the original snowflake peeks through from the background. 

Next I stamped and cut out the heart-in-a-circle flower head from EDY06, I cut them apart, as I only required the rings.  I glued them onto roughtly torn circles of book text. 

to create the stems, I painted some heavy smoothy  with various greens, then I took 3 separate words . Reach..Bloom and Grow from my stamp plates and repeated them in lines. 

Next I coloured some more smoothy and stamped the lollipop heads. Once cut out I needed to find a way to raise them up. A small wooden cotton reel would work, as would a bingo counter, but I had neither of these. so I punched out a stack of card circles, glued them together, and painted them.... Voila! 

For the grass, I used the border/stem stamp from EDY06....remember to use the stamps for different purposes. This can be a border, but also a flower stem.... and in this case I just used different lengths to create grass. 


Here you can see how the lollipop heads sit on the circle stacks that I created. 


Finally I painted and stencilled  more smoothy and stamped the 3 sets of leaves one from EDY05, one set from EDY06 and the third set from the flower mini 03.  


Once everything was glued in place I added my finishing touches using a white Posca pen. 


I hope this gives you some ideas on how to cut stamped images apart and mix them up. 

Darcy x

My stamps are also available from