Showing posts with label WOW. Show all posts

Sunday, 12 June 2016

Fabric Tags

Over on the PaperArtsy blog this week there is a challenge topic of Fabric. This can be scary for some, and others just don't like sewing, or don't have a sewing machine. So I put together these little tags using fabric but no sewing. 

I started by die cutting some tags, and then did cutting a shape in the centre. I did several, all different shapes. I also cut a piece of fabric for each tag the same size as the overall large tag. All the shaped dies that I used are from PaperArtsy. (Hearts, leaves,bird)


I glued the fabric to the back of the large tags so that it shows through the die cut shape... and basically that's it.. All that is left is to add a little embellishment. 


This was a white tag, I painted it with Fresco Lilac, then edged the tag using Crayola Twistables.(available from PaperArtsy) 


As this tag is black card I needed the edge to have a bit of shimmer, so I blended some Treasure Gold around the edges. 


I then added a ribbon and this sentiment from ESN20 using WOW embossing powder in Brass Sparkle. 


This one on Kraft card just needed twine and a little ink around the edges, and the sentiment from EKD02.


The painted tag had a little lace added and the sentiment from  ELB28,


To cover the edges of the fabric on the back I added a skinny frame of card and glued that on. 


If you fancy a go with fabric but no sewing then try these out, they are really,really easy. 


Darcy x

Saturday, 16 April 2016

Flowers for Men

hi everyone, men's cards are always so difficult aren't they? I wonder, is it us that makes them so hard by putting what we think men and women want into segregated boxes? Why should women only get flowery cards and men get cars, planes, boats,football etc? I am sure not every man is  interested in those things.. 

So why not give flowers to a man? I am not suggesting go all out pink and fluffy, though some guys might like that too.. but flowers are pleasing to look at, for everyone. So pick your colours and go for it. 

I had some leftover card from a previous project (flutter nib)

So this was the leftover bit, it started as Baltic Blue, then Crackle Glaze then China Fresco paint. Onto that I embossed my dotty circles(EDY17) and Emma's large rings (EEG15)in Blueberry WOW embossing powder. 


I had used it as it for the original sample, but for this one I wanted to knock back the blue a little. I dry brushed on some Snowflake, and once dry I gently rubbed it back from where it covered the embossing. 

I then added Sepia Archival ink to the edges and then a little black. I prefer to use 2 colurs on edges where I can as it adds just a little hint of dimension. 


This too was a leftover from the original project, one lonely little flower. Coloured with Orange Blossom and Red Geranium Archival ink. 


I cut this down to a square and added Sepia and Black to the edges, and a blue brad to the centre. 


To the blue background I added brown and white bakers twine, remember that stuff? A couple of years ago everyone went mad for it. I am betting you have some in a drawer somewhere. I went through a phase of making my own, I should revisit that technique and blog it sometime. 


I added Onyx Pearl Liquid Pearls to the corners to ground and tie everything together. it is always good to have repeating elements across a piece. 


All done, I think it looks classy and elegant, neither masculine or feminine. Perfect. The text is from my Christmas stamp EDY15. 


Darcy x

Thursday, 14 April 2016

Flutter-nib

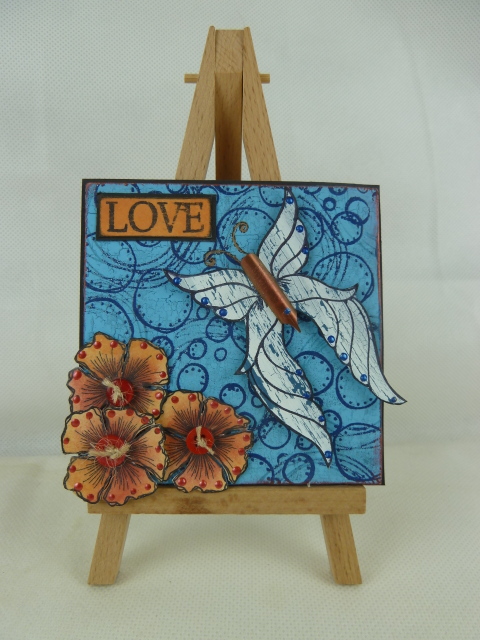
A new family of winged insects has been discovered, stylishly adorned with pearls and gilding they flit around the flowers . 

This is a  piece of crackling and embossing and measures  is 4x4 inches. 


My small frilly flowers were stamped over Orange Blossom ink


and then shaded with more Orange Blossom and Red Geranium. 


For this project I used 3 flowers. I added liquid pearls and small buttons. Two are glued on flat while the third flower is raised up. 


Onto smoothy card I painted more Baltic Blue, then crackle glaze and then Snowflake, all by PaperArtsy. I like to always rub back my crackle to distress it further. 

Once dry I stamped the wings from EDY17. 


Again I added liquid pearls and also an old pen nib, this was rubbed with Ruby Treasure Gold


The word love is from EDY18. I adore how dimensional this is..it really does pay to create different but complimentary layers. 


Darcy x


Monday, 29 February 2016

Just a Quickie

This is a quick little tag. I started with a size 8 manilla tag and added some stamped circles from EDY19 using Snowflake paint. Once dry i blended on some Tango paint. Then some random lines of Cherry Red using a credit card. 

Over this I stencilled with versamark and then added Blueberry embossing powder from WOW. 


The focal image is very simple, just the berries from EDY17 stamped onto book paper. 


To finish off I added the text, wrapped red ribbon around the tag and doodled around the edge with a Posca pen. 

I love how my new quotes have different sizes in the text, makes them so much more interesting. 


Darcy x

Friday, 26 February 2016

Little Shrine

A little shrine today, this is a small wooden hinged shrine available from PaperArtsy. To ensure the paint colours were true I first coated the wood with Snowflake fresco. 


Next I covered the whole thing, both sides, bak and front and the edges with areas of Tango, Cherry Red and China fresco paint. Once dry these were rubbed back to distress and blend the edges. To blend even further I added just a little snowflake. 


On the front I added the text from EDY17 and EDY18 using Sienna Archival ink. Over this I stamped the Cherry blossom tree from EDY19


In the centre I embossed the dotty circles from EDY17 using WOW embossing powder in Bark. 


Now to create the embellishments. I die cut some brackets from a sizzix die. the bracket is actually larger but I trimmed it to just these bits. i glued 4 brackets together in 2 pairs. These were painted in Cherry Red and then sprayed with Lindy's Stamp gang. 

The heart is also a die cut (PaperArtsy) this was painted and then stamped with the spikey flower from EDY18. Then part of the wings from EDY17 were added.


The frilly flower was stamped onto painted book paper and also onto painted card, along witht he single words. 


Here is everything layered up and glued to the shrine


..and the other side, love this frilly flower. 


Tho the back won't be seen, it shouldn't be neglected. I embosssed this using the dotty circles, this time using WOW embossing powder in Pomegranate and Blueberry. 


Finishing touches were white dots with Posca pen and dots of liquid pearls. 


These stamps are available now from your favourite PaperArtsy retailer. 

Darcy x

Tuesday, 26 January 2016

Art Rings

Here is embossed card number 3. I started by embossing using this scratchy stamp from PaperArtsy EEV02, I added the WOW powder in diagonal sweeps, using Chocolate Caramel Pearl, Parma Violet and Frozen. 


I then added more Chocolate Caramel Pearl around the edges. 


mmm how yummy is that.. 


I then covered a piece of card  with parma Violet embossing powder and heat set it. once cool I stamped this circle  image on top. EEG15 The circles were them embossed with Ebony. You have to work quick and not overheat the top layer because of course you are remelting the bottom layer, heat too long and they will bleed into each other. 


Once cool I cut them out, leaving just these two-coloured rings. 


See how you get the sheen from both colours. it makes ita bit more special, rather than paint or ink in the background. 


The text is done with WOW Ebony over Ice Blue paint. 


Here is everything layered up. 


I love this, I think it is my fave of the three. 


I hope those three cards have given you some ideas of how you can use your embossing powders. 

Darcy x

Friday, 22 January 2016

Best In Blue

Here is number 2 of my embossed cards. i began by melting Melt It powder with WOW embossing powder in Whirlpool, and also some chicks cut from a hot glue stick ( the kind you put in a hot glue gun) I wanted the embossing to be less brittle and the addition of the glue helps with that


I poured everything out onto a non pourous sheet and spread it a little with a metal palette knife. I didn't want a solid piece, i rather like the gaps. 


While that was cooling I dabbed some paint onto a piece of card. I used PaperArtsy Fresco in Cherry Red, China and Pansy. 


I scraped the paint across the card, and added a little white too. 


I then added random amount of embosing powder over the paint. I used Vintage Amethyst, Whirlpool and Strawberry Crush

I have all my embossing powders stood in a drawer, lids upwards. to see which is which I took off each lid and pulled out the little foam/plastic circle. I then embossed a circle of card for each colour, popped it into the lid and replaced the foam/plastic circle. Now I can look down into the drawer and see at a glance which colour I need. 


Look at that random sparkle.. 


This card has a linen texture, I dry brush paint accross it, just enough to pick up the texture. I then embossed the text from HPXT03 using WOW Ebony. 


I peeled up the Whirpool embossing from the sheet and cut 2 hearts from it. I like how they are lumpy and a bit shabby... perfect. The text was mounted onto the dry brushed card and turned into a small tag. 


Just before mounting everything together I flicked some Nougat Fresco  paint across the background. 


Try some freehand embossing in your backgrounds.. 
Darcy x