Showing posts with label brusho. Show all posts

Thursday, 24 March 2016

Journal page

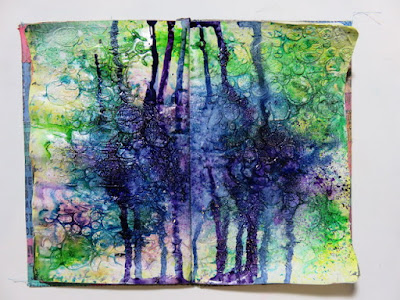
Time for a journal page, this is not my usual kind of page. I generally don't do very busy,bitty pages, but I wanted to do something out of my comfort zone a bit. By the time the background was done I loved it, and I loved the stamped embellies... I am just not sure they go together. But it is done, and I am going with it, that's the only way to learn what we like and what we don't right?


I began by stencilling the 'Art is' stencil all over the double spread using black gesso. 


Next I added the stencilled circles using Dreamweaver crackle paste. I am not overly thrilled with this paste, it always seems, well.. just a bit lazy to me, I guess that sounds silly lol. it's almost like it can't be bothered to crack! I am never really impressed with the cracks from this, so i am still on the hunt for a really great crackle paste. 


Once the paste was dried and half heartedly cracked, I added a wash of Limelight Fresco paint, then some Snowflake to knock back the citrus colour. 


I had been talking with Leandra about how to make Brushos more permanent, and so decided to use some gum arabic. I have the liquid version. I painted it over the page and then sprinkled on some Brusho powders. To activate the powders I then sprayed them with more gum arabic.


( I was hoping trapping the powders between the 2 layers would hold them. but right at the end I went over some areas with a damp brush and the colour still came up. So I am not sure how effective the gum arabic was)

The page was very wet at this point, so I used my heat gun on high, and really aimed it at the paste circles. I was thrilled to see them bubble , I guess it was the coating of gum arabic. Anyway I ended up with dragon skin!!!


There was at this point a distinct smell of cooking/baking, kind of sugar, like toffee apples. I  am assuming that was the heat on the gum arabic. It is a natural product and is used in many food items. but here all we were cooking was dragons. 


I then sprayed and dripped Adirondack sprays in Denim and Purple Twilight, and flicked on a little snowflake paint. 


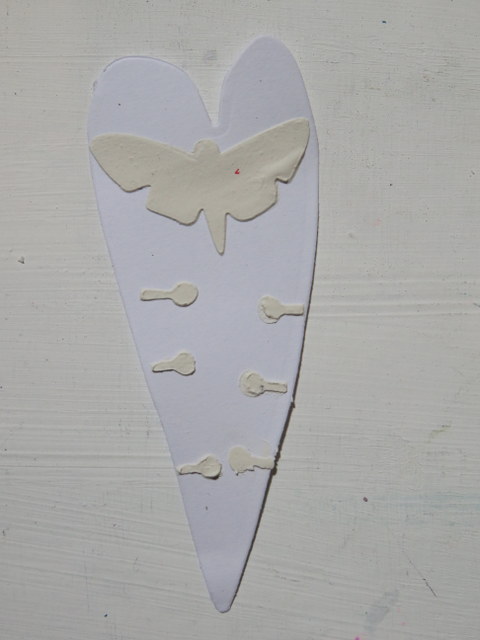
I took a die cut heart and added grunge paste through PS029 to get a small butterfly. I also added the knobbly bits from around the lollipop flowers on PS030. On their own they look like tiny keyholes!!!




I painted this with Mermaid, Bora Bora, Beach hut, South Pacific, then added a little Treasure Gold. 

I painted fabric with Bougainvillea, Lilac and Captain Peacock, then I stamped the spikey flower from EDY18. I also stamped the text from this set. 


On some old scraps of painted paper I stamped the wings from EDY17, I kept them whole to start with but by the end I had cut them down smaller. 


I wanted to use the dotty circle border, so i stamped that all over some painted fabric and then cut arrows from the fabric. 


Now I loved the background, but my flowers and heart didnt not look right over the busy background, so to tame it slightly I added some book pages.  Then I glued on my focal pieces. 


To embed them more into the page I added white circles using paint and a lid, I also added some white using bubble wrap, and finally some black splatters. To finish I edged the pages with the 'torn paper' edge stencil PS031


As I said, a bit different for me, usually I have a proper focal point or the page tells a story, this one is much more abstract. The only thing I really like is the Dragon skin and I will be using that again on my papier mache snail. 

Darcy x

Saturday, 10 October 2015

Sugar Skull Witch

I am having so much fun with this free stamp from the cover of Craft Stamper. I figured it would make a great little witch. 

I drew out a body and a hat.. and I stamped the skull on card that was first painted with Blush and Snowflake Fresco paint. 


I painted the neck, hand and thigh the same, and then mixed Elephant and Eggplant together to paint the dress and hat. Once dry I added shading with Pitt pens. 


I coloured the skull with Pitt pens and attached it to the body and hat. I stamped the bird from HPHW03, cut that out and glued it to her hand. 


I cut a piece of Watercolour paper down to size and painted it with a mix of Toffee and Buff, this gave me a nice neutral background. I used the circle from EEV02 and a mix of Snowflake and Haystack to create the moon, then I stamped and embossed the pumpkins from HPHW03 and the tree from EDY06. I used Black Glint WOW powder. 


Next I splattered the background using twinkling H20's, i used Bolivian Blue and Bamboo. Then I added a little gloss glaze onto the pumpkins, while this was still wet I sprinkled Light Brown and Gamboge Brusho powders onto the pumpkins. 


The bats are from HPHW04, these are stamped in black archival ink. 


To add a little shadow to the ground I mixed Slate with some Bamboo Twinkling H20. 


I painted some card with a mix of Elephant and Bolivian Blue H20, over this I stamped the skulls from HPHW03, these were cut out and glued along the bottom edge. 

Then I glued on the witch. 

Finally I added Graphite texture paste around the edges and added highlights here and there with a white posca pen. 


Darcy x


Sunday, 20 September 2015

Walking On the Moors

This evening I have a post over on the PaperArtsy blog, inspired by the beautiful Yorkshire Moors that are not far from me. 

I have used some of my older stamps and Brusho Pigment powders to create a moorland scene. 


I love this piece, it has such great texture. 


if you would like to see how I made this then pop over to the PaperArtsy blog where you will find  step by step instructions. 

Darcy x

Tuesday, 15 September 2015

Use It Up...

I have been trying to use up some old craft paints. As you know I do a lot of work for PaperArtsy, and their Fresco Finish Chalk paints are truly wonderful. Trust me I simply wouldn't use them if I didn't like them. Since switching to their paints my old ones have just sat in baskets not being used at all, the quality, coverage and colour choice just isn't there. 

However, I hate to waste. So every now and then I try and use up some of the old craft paint. I am doing ok. I had around 50 bottles and now i am down to 10. I have also been using up some paints that I made myself a few years back... 

Last week, I cut off some large A3 pieces of brown parcel paper, and started sloshing paint around. no need to be careful, this stuff needs using up. I painted and stencilled...I added collage images and words, more paint, more stencilling, some stamping, some strips and splats...

Another 8 empty bottles went in the bin, and I cut down the papers to about A5 size and ended up with a 4inch stack. 


I put some aside to use in an upcoming class project, and set about die cutting the others. i did birds and flowers and leaves and circles and hearts and in the process I busted one of my cutting plates. 

Granted this thing is as old as the hills and has been cracked for probably 2 years, but it has finally bit the dust. 


but I did get a huge pile of die cuts..


I love to keep a folder of these ready to make quick cards when needed... well sort of quick, I don't actually make anything quick lol

but I did make these 12, i will send a set of 6 to a friend and keep the other 6 for birthdays.. now i just have to remember to actually send them.. 


Notice the 2 black butterflies? they are Graphite texture paste( by Prima) pushed into a silicone mold and left overnight. The white ones are Golden Regular Gel. 


The Graphite ones come out all sparkly and are pretty left as they are. 


I coloured the white ones using Treasure Gold. 


The coloured backgrounds are Brusho. You will see I used one of my new Christmas stamps 'With love' it is my own handwriting and so useful. 


Darcy x


Monday, 4 May 2015

Tulip Cards

I needed a birthday card for a friend, it turned out really lovely so thought I would show you. 

I began with a card blank and added a small square of kraft card to the centre. 


I then coloured some more card using Brusho pigments. Find out about them HERE. This was added over the kraft card, leaving a small border. 


I had been having a tidy up in my chaotic art room, and came across some collage sheets that i had made ages ago. They were heavily textured, with bits stuck on them and layers of paint, stenciling and stamping. but I was stuck as to what I could do with them. Literally to get them out of the way I die cut them all up into birds,flowers,leaves and hearts. All dies from paperArtsy. 


I also cut some skinny strips from the edges of the papers. 


and began to build up the flowers. 


adding a leaf at the bottom. 


I had enough to make 5 cards..


I sprayed Adirondack ink onto some envelopes and added some text stamping. 


Using colours to match the cards.. 


I put them aside, and when I looked at them again I decided them needed a little sentiment, so added a different one to each card. 


I really like these cards, pretty much made from leftovers. I almost threw out the collaged papers, they look so much better at die cuts. 

Darcy x
