Showing posts with label Cards. Show all posts

Sunday, 8 July 2018

A birthday Card

I am terrible at making cards, really,really terrible.. not the actually making so much as the remembering to make and then remembering to send. It is a rare thing indeed to get a homemade card from me lol However, My brother is a huge Batman fan, so I just had to make a card for him.

I previous years I have done silhouettes of the batman character, but this time i wanted to try a different character and more of a realistic sketch. 

I started out with sketching the general shapes. 


and then blocked in the darkest areas..


Working on one area at a time...


I wasn't sure at all that I ha captured the features well, I wasn't well and was sketching this in bed. It looked more like Einstein than the Joker lol


I knew I wanted to work in graphite, but I also wanted a splash of colour. Using Crayola Slick Stix I added the bright red scar across the mouth. 


Here it is taken in better light, it is also laid on my ipad cover. I think it would look cool in a red frame. 


Darcy x


Sunday, 23 October 2016

Tiny Teabag Sketches

As I had amassed a bagful of tea bags, I decided to do some tiny animal sketches. They are so quick and easy to do. All I used were Derwent charcoal pencils and a little gesso. 


Charcoal is very smudgey and as such very forgiving, you don't need to be very neat or accurate.. 


I mounted each onto a piece of neutral/beige card. 


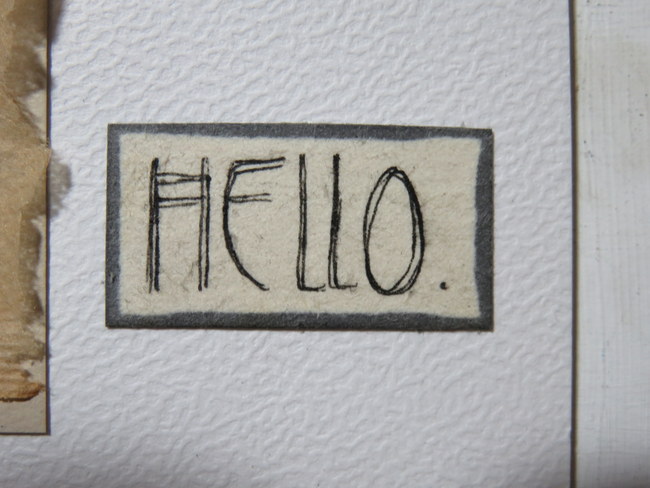
and wrote the sentiment on a piece of old book page..( I use the centre text of pages for collage but I keep the plain margins from book pages to write sentiments or stamp text.. )

I used a fountain pen for this but you could stamp your text. 


Then I mounted each animal and sentiment onto a card blank, 


They really don't need anything else, I guess this is my way of doing CAS, something I find impossible in paint. 


I really like them, they are sweet, and with a simple 'hello' greeting they can be used for any occasion. 
Darcy 


Tuesday, 21 June 2016

Fly By..

With Batman, got a million things to do and no time to update here properly. So just dropping this in. I needed a birthday card for my Batman loving little brother... 


Black gesso, white paint and PaperArtsy London Bus. with a Jofy text stamp. Highlights with a Posca pen. 

Darcy x


Sunday, 29 May 2016

A Special Day

Someone very lovely that I know has just had a very special day.. she is now a 'Mrs' 

Huge congratulations.. 


1. Card embossed with a Cuttlebug folder then a heart removed from the centre. 
2. Mount over turquoise mulberry paper
3. Fill the centre with buttons and liquid pearls. 

Darcy x

Monday, 21 March 2016

Blooming Birthday

Today I have a sweet birthday card for you. I started by scraping Blue Oyster and Lilac onto a card, I left bit of the card showing thru to add a third colour. 


Over this I added a light coat of Snowflake using a brayer. This adds highlights, unifies the other colours and adds texture. 

With Sky Blue Archival ink I stamped the text from EDY19, just randomly and not fully, I wanted a more patchy effect. 


Next I stamped the cherry Blossom tree using Watering Can Archival ink. 


 Each of the dots was covered with Orchid Fresco, and then a tiny white dot added with a Posca pen. 


I stamped the spikey flower from EDY18 onto Orchid, DollyMix and Honey Dew. 


Each flower was cut out, the honey Dew one was left full size, the Dolly Mix had a little trimmed off each petal, and the /orchid one had even more trimmed off. This graduates them nicely. 

Where the little dashed lines were cut off I added them back in with a grey fineliner. Don't forget if you are creating a dimensional flower to colour the back of the petals as they will stand up and you don't want to see the white backs showing. I coloured the back of my petals with a Promarker. 

I also dug in my stash of leaves and found these ones, they are from EDY11, and the text is from EDY06. 

I love mixing up the sets, they all work so well together. 


Before adding the embellishments I also added a little more stamping to the background. Using the small splotchy stamp from HPXT01 I stamped randomly with Turquoise Fresco paint. This ties in and matches the brad in the centre of the flowers. 


I love how much height you can get on layered flowers. 


In fact the flower is so deep it won't fit into an envelope, I have had to make a box envelope for it. 


Remember these stamps are all available now from your favourite PaperArtsy retailer. 

Darcy x


Monday, 14 March 2016

When Is A Card...

... not a card. Well, when it starts out as a card and turns into something else. 

I fancied a little gell plate session. So I grabbed my plate, some paint, stencils and some heavy weight smoothy card. 

This was my first page, it started black with some stencilling..


Next I added pale green, then some pink and finally blue.. forgot to take more photos. 


This was from the 2nd sheet, first blue..


then orange.. more stencilling, and then yellow, again I forgot to take photos of each stage. 


These are the pulls that I made, the pink one is actually some of the yellow one with added pink. I can never quite decide whether i think gelli printing is worth all the effort, it took ages just for 2 sheets. I could have painted more than that in half the time. 


I used my new butterfly stencil PS029 to outline a butterfly on one of the prints. 


and PS030 to make the lollipop flowers onto the pink sheet. 


I used PS031 and some Stewart Gill paint to create an edge on my card blank. 


I then added my darker print to the centre. 


and added the other bits plus a title. 


I liked it, but somehow it just didnt seem finished.  Because I had used heavy cardstock, and few layers of paint, the front of the card was now quite  weighty. To balance that out I brayered on a little paint onto the back of the card. 

This made it feel better, but still I felt it needed more. then it hit me, it really was more like a book cover now than a card... so why not add pages. 

I rifled though by bit bag and pulled out some previously painted left over papers and cut them to size. Some are just paint, some stencilled, some marbled. 


I stitched them intothe cover..


and voila! a 6x6 travel size mixed media journal.. love it!


Darcy x

Tuesday, 23 February 2016

Stencil It..

This evening I wanted to show a card made mostly with just stencils. I began by scraping Smurf and Moonlight Fresco paint over the card. This is textured card, so the paint doesn't hit all of the surface, I like this as it allows the colour of the card to show through. 

Next I used my torn paper edge stencil PS031 to create the line of the landscape. I did the darker green area first in Tinned Peas and then angled the stencil and added the area at the back in Sage. 


Next I used the grass edge stencil, PS029 and Hyde park and Guacamole to create the grass in the foreground. 


Now for the clouds, I used the random edge stencil PS030 and China, then some snowflake on top. These worked out so well. I also used Cherry Red to stencil the berries , they are done with the hanging bead stencil from PS031. Once dry I outlined them with black pen. 


The only stamping here are the flying birds from EDY10, using Watering Can Archival ink. 


I then added white highlights to the berries. I blended Cornflower and Hydrangea and Black to the edges of the card, this really makes the images pop. 


Now for the focal image, I stencilled the large butterfly from PSO29 using Eggplant, Cherry Red and Tango, with highlights of white posca pen. 


I then decided the berries needed more colour, to differentiate them from the butterfly,  so I added Tango dots, and then went over them with white liquid pearls. 


The stems on the berries still didn't have enough contrast so I added yellowy orange to them using a Derwent Graphik pen. 


I am really pleased with this one, I love how the scene all came together with mostly just stencils. 

Darcy x