


Previously I had used acrylic paint to colour my patchwork pieces, but this time I used my Letraset markers.
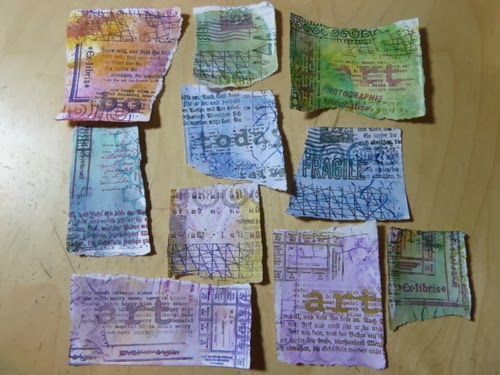
To start with I scribbled on a craft mat with Aquamarkers, I spritzed this with water.

then I ripped up some pieces of cheap cartridge paper, and dragged them through the ink.

next, and still using the Aquamarkers, I scribbled onto some stamps and then stamped the edges of all the pieces. I used complementary colours, so that the edge stamping becomes part of the background.

To create the focal decoration on the pieces I used the Sara Naumann journal stamps from paperArtsy, I switched to the Limited Edition Promarkers and chose colours that would stand out against the background. So on the green background I used a red and on the purple I used a yellow and so on.


once the backing paper is cut to size you can start to add the patchwork pieces, I always dab a little glue stick on the back of each one. You don't need to glue the whole piece, just a dab in the middle to hold it in place while you sew. Make sure to slightly overlap each of the pieces.

thread up your machine with a nice coloured thread and set it to zig zag. Now stitched over all the raw edges to hold them down.

To finish it off and to cover all the backing threads, glue a piece of thin paper onto the inside of the cover. I used black wrapping paper.

As soon as this is dry, you can stitch all around the outside edge, again with zigzag, then fold in the 2 short ends and stitch those into place, creating 2 end pockets. Now you can slip the front and back covers of the diary into the cover.

I finished mine off with a little artwork on the front cover, again using the limited edition promarkers.

I loved it so much I ended up making 3 of them, I will show you them all in another blog post on Weds.

in the meantime how would you like to win some of the Aquamarkers.

To win I need you to do TWO things for me, please do BOTH otherwise I cannot enter you.
1. go to my post on the Letraset blog and leave a comment there. LETRASET BLOG LINK
2. come back here and add your name to the link up tool.
I will announce the winner on Monday 6th January.


.gif)


Thank you so very much for sharing this technique - it is brilliant and one that I will definitely have a go at. I will have to use water colours or ink instead of the aqua markers. I won't enter this giveaway as I was lucky enough to win one of yours a month or so ago. I am so very grateful to your for sharing how you create your amazing works of art. This is just perfect.
ReplyDeleteI can't wait to see your next tutorial
I loved this technique when you shared at PA and I still love it. This journal cover is fantastic. Great art
ReplyDeleteGreat technique - thanks for sharing
ReplyDeletei love looking at this art!!
ReplyDeleteah i love this darcy
ReplyDeleteSuper cool technique! Love it.
ReplyDeleteHappy New Year!
Your diary looks fantastic with its new cover.
ReplyDeleteI love this technique every time you show it. Your cover looks fabulous! I would love to have a go and maybe one day I will be brave enough to fire up my sewing machine!
ReplyDeleteEmma x
What a great way to dress up (or cover up) the outside covers of any kind of book. I absolutely adore this technique and the look you achieved. Nice work, as always.
ReplyDeleteI don't know how to capture the URL of my blog post - but that's okay I don't have to win anything to enjoy your amazing art! :)
ReplyDelete